Showing posts with label card. Show all posts

Monday, June 24, 2013

Mother's Day Card: MOM


Still working on backlog, as you can see.  This past summer has been quite busy, with back-to-back deadlines for projects.  And here is the last of the Mother's Day projects, a card for Memory Lane Store's Mother's Day card challenge. We were given this sketch by Kathleen Llanura (of KATSpaperfinds)  as inspiration for our cards, and I thought the sample card is just adorable.


So this time, I was leaning towards a shabby chic-style card.  I must confess, I am still trying to find my personal style (though I think I'm more of the clean and simple type), and it's so much fun trying a lot of different things out.  My card actually didn't take too long to make since I already had a design and color scheme in mind.  So after I set aside the flowers, lace, and ribbon that I wanted to use, I cut out all the shapes (bird, frame, leaves, and flourishes) with my Slice and then sprayed them with glimmer mist.  But before I glued all the elements down, I dry embossed the cream colored cardstock that went on top of the card base.  The finishing touches were the letter stickers that spelled out "MOM" (I love this vintage-type font) and a little bit of bling on the oval frame.

I'm actually very happy with the finished product given the amount of time I had to make it.  But I was sure that I wasn't going to win this challenge given the caliber and experience of the other ladies who joined (click here to see all the entries).  And on top of that, aside from a winner that is decided on by a panel of judges (Top Choice), a second winner (People's Choice) is determined as the entry that had the most number of likes, which I'm not so excited about.  I'm just not the kind of person who solicits for likes... any kind of challenge on Facebook that involves likes, I'm very weary of.  But I just joined this one for the sheer joy of creating something.  And for that, I got a bunch of freebies from Memory Lane Store. I was so happy when the package came in the mail. :)


Materials: Cardstock, glimmer mist (Tattered Angels), ribbon & lace (Carolina's), gem stickers, letter stickers, fabric flowers (All About Scrapbooking), mini paper roses (Kraft Yard); tools: Sizzix Texture Boutique (with Textile Texture embossing folder by Cuttlebug), and Making Memories Slice die cutting machine (with Vintage design card).

Sunday, December 16, 2012

Twelve Crafty Days of Christmas - Day 1: Christmas Stocking Card


I've been planning to work on many holiday projects for many weeks now.  But with work being crazy hectic since the third quarter started, there just wasn't any time.  So I was anticipating that with the Christmas break coming up, I would be able to work on one project a day.  And I had meant to start on the 14th (our last day of work), which meant that the twelfth day would actually fall on Christmas day.  But unfortunately, all the stress and exhaustion of the past weeks have finally caught up with me that I only felt up to posting anything today.  So letting go of all my OC-ness, I decided to just push through with it anyway.  Although if I'm being honest, I cheated a bit for this first project, since I made this weeks ago. ;-)

But this truly counts as this was my first honest-to-goodness Christmas project this year.  I joined a Christmas card swap (my very first one!) and had to send this out by the end of Nov.  This card took me quite a while to plan and to actually create.  I've been liking all the patchwork designs I've seen in magazines and on the 'net and thought I might give it a try.  I'm happy with how it turned out, I hope the recipient likes it, too> :-) 

Materials:  Patterned paper (K & Co., Nitwit), metallic paper (Star Paper Corp.), cardstock (Moods), glitter glue (Leeho), gem stickers (All About Scrapbooking).  Tools:  Making Memories Slice Cordless Design Cutter, Making Memories Slice Mistletoe Design Card, Martha Stewart Crafts Doily Lace Edge Punch.

Monday, October 8, 2012

Celebrating World Card Making Day

Sunday afternoon marked the first time we'll be celebrating World Card Making Day.We had been anticipating this day for quite some time and the preps I did took me well into the wee hours of Sunday morning.  I had planned on each kid making three cards in all - a Halloween card, a Christmas card, and an anything-goes card, where the kids can use it for any occasion they want.  I made a sample for each and prepared six kits per card (expecting four kids and one adult, plus one for me to demo).  It probably took me much longer to look up ideas and inspiration than to work on the kits, but it was all worth getting only about three hours of sleep.

 The sample cards.  It took a while to decide what cards we would make, 
but in the end, the prime consideration was that they should be something the kids
 would enjoy doing - nothing too complicated, but something that we'd all be proud of.

Took a pic of all the kits I prepared the night (up until the early morning) before.  
There seems to be a lot (18 kits in all), but compared to the first ever project we did, 
this actually look less time and effort to prep.

The Halloween card sample up close.  I admit, the color isn't all that Halloween-y, 
but I really like how this turned out.  The patterned paper is pretty but a little bit eerie.  
 
A really simple Christmas card (sample).  I cut all the patterned paper strips, 
which were all double sided, so the kids can choose which design they would like to use.

The sample I prepared for the anything-goes card, which is basically an all-occasion card 
that the kids can turn into any kind of card they want.  I made this one 
with a stamped sentiment that says "thinking of you".
 
The fruits of our labor.  I like to keep the design simple enough so the kids can easily follow, 
but I also love it when they put their own twist to it (like the one on top).

Our anything-goes cards:  there's a birthday card, a "thinking of you" card, 
a "Happy New Year" card, and one that says "happy everything!"

Jessica with all the cards that she made.  

In the end, the afternoon went very quickly.  Both the kids and the adults had a great time.  It's a great way to spend an afternoon seeing the kids smile, along with the awesome feeling that they've accomplished something.  Hope you had a fun and fruitful World Card Making Day!

Saturday, October 6, 2012

Happy World Card Making Day!

I didn't know that this particular holiday was celebrated until I came across this newsletter from Creating Keepsakes about their countdown to said holiday several days ago.  I told my sister that we can do a Crafty Kids weekend with card making.  We actually get to make cards with the kids tomorrow, but I should be doing preps today.  And all I've done so far is look up ideas online and browse old card making magazines here at home.  I've listed some ideas of my own and done some sketches already.  But as far as getting all the elements that will go on the cards (and based on my list, there will be lots :-b) ready, nothing has been done.  I need a swift kick in the you-know-where to get me going I think. - 5:03PM, 10/06/2012 (Philippine time is GMT+8... so when I get stuff done, hopefully it will still be World Card Making Day somewhere!)


And so... 6-1/2 hours later.  I've only finished one card, as well as six kits for the kids to make it.  It's a Christmas card and I can't say that I designed it because I've seen different versions of it before.  But it has to be kid-friendly and I thought that it would be fun to do.


Two more cards to go!  11:47PM, 10/06/2012

Tuesday, October 2, 2012

Crafty Kids Project #3: Birthday Card for Lola


Last Sunday, my grandmother celebrated her 86th birthday.  The week before that, we rounded up the kids (great grandkids, actually) to make a birthday card for her.  "Lola" is Tagalog for grandma, and interestingly enough, great grandchild translates to "apo sa tuhod".  Which literally means grandchild at the knee (yes, the body part), while great great grandchild is "apo sa talampakan" - grandchild at the sole (as in the bottom of the feet).  Odd, isn't it?  I wonder how those terms came about.  But I digress, so back to the kids making a card.

Actually, I recently purchased this flower-shaped mini album (made up of 5 foam pages and bound with a ball  chain) for this particular occasion, so the kids can each have a page for their greetings.  But instead of letting them loose and do whatever they want with their page, in the end my sister and I wanted to make a unified mini.  As I was browsing Scrapbuck.com (please check them out - they have a lot of great stuff at a very reasonable price) a couple of weeks ago, I saw some really cute animal wall art.  And this has inspired me to have on each page, a particular animal with a its own sentiment.  Here's what I came up with:
  • Bird:  "A little bird told me it's your BIRTHDAY!" (cover page)
  • Chicken:  "How egg-citing!"
  • Hippopotamus:  "Hip-hippo-ray!"
  • Bee:  "Bee happy!"
  • Cat:  "Have a purr-fect day!"
To prep for this project, I stamped the sentiments on white cardstock, sketched out and cut all the shapes  for each paper pieced animal, and finally, left out the colored markers and stickers so the kids can decorate the pages however they wish.  And so here they are with the pages they made.


This is a little more effort on the kids' part as when they got their kits, they had no idea how to arrange the pieces to make up their animal of choice.  Fortunately, I still had my original sketch of the different animals and what they were supposed to say, so we just passed that around until everyone was able to finish their page.  Then they wrote/drew their personal greetings on the back of their page.  And by the way, my sister stepped up to make the hippo page, since nobody wanted to do it.  The kids were probably intimated by the number of pieces (10) or got confused because it's pink.  In any case, we all had fun.  It's all in the googly eyes, I think. :-) 


Materials:  Mini album and stickers (All About Scrapbooking), magnetic alphabet stamps (Making Memories), ink (Studio G), border die cuts (Papemelroti), others - colored markers and googly eyes.

Saturday, September 22, 2012

Handmade Birthday Cards

After I finish a layout or some other type of crafty project, I have a bunch of scraps that I simply cannot throw out.  I keep them all to use in other projects, but the easiest way to finish up those scraps it to use them on cards.  Apart from the cardstock, this card is made from scraps.  So those tiny pieces of adhesive patterned paper still got some use, since making the pennants for the banner didn't require large chunks of paper.  The border on the bottom comes from a narrow strip of patterned paper left over from a layout I did a while ago.  I hand stitched the string for the banner and wrote the greeting right on top of it.  I made this card almost two months ago, but did not upload it 'til now.  And would've forgotten about altogether it if I hadn't made this next card for a dear friend of mine.


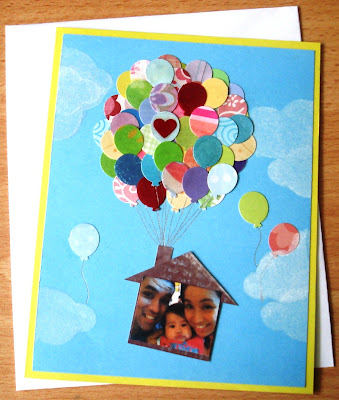
This card is actually more than a week late (my friend's birthday was last Sept. 14th).  Though I had planned on making it way before, everything just got crazy hectic at work and I just didn't have the time to make it until last night.  This is inspired by the movie "Up", which my friend really loves, and I've actually seen layouts online that are similar.  The balloons are punched out from assorted scraps of patterned paper/cardstock.  I've put glossy accents on some of them to give them more dimension and a balloon-y kinda feel.  I cut out cloud shapes from scratch paper that I used as masks.  I simply pressed the white inkpad into the cardstock base and blotted the extra ink with paper towel to even it out.  The sentiment inside reads: "Our wish for you is that everything will be on the UP & UP this year and in the years to come." 


Materials:  Cardstock (All About Scrapbooking), pen (Uni), ink pad (Fancy Ink Box), others - embroidery floss, assorted patterned paper & cardstock, tools - border punch (Fiskars), craft punch (CarlaCraft), and stamp (Crafty Secrets).

Wednesday, May 16, 2012

Easy to Make Cards


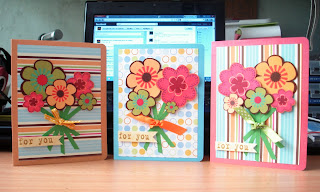
So after cleaning my desk, the very first thing I made was handmade cards.  I have long been wanting to work on these after being inspired by cards that I've seen in magazines and on youtube.  And I have to make a special mention: Kristina Werner's cards are awesome (http://www.kwernerdesign.com/blog/).  Her cards are really pretty and simple, and the way she makes them in her videos is simply inspiring.  Though these cards I made were actually inspired by an insert in a Scrapbooks etc magazine that I got last year.  It's a special on cards: 12 cards for any occasion, and I just wanted to do something quick and easy.  Although these were in no way quick since I had to cut out the flower and star shapes.  Sadly, I have to work some more on my scissor skills, but I'm pretty pleased with the results.


Tools & Supplies:  cardstock, patterned paper , ribbon, brads, and letter stickers (All About Scrapbooking), ink (Craft Smart and Fiskars), alphabet stamps (Making Memories), corner rounder (EK Success)

Saturday, September 18, 2010

Sunshine-y Birthday Card

The front and back of the card


A good friend was about to celebrate her birthday a couple of weeks ago. I wasn't really sure if she was turning 50, so I made this card for her, with lots of space for everybody to write their birthday greetings and messages on. But when I confirmed that she was indeed celebrating her golden birthday, we had to do something special for her. So this card is just waiting in my desk drawer at work for now. Btw, this card is (again) mostly made from scraps. :)

What's inside