Showing posts with label birthday. Show all posts

Tuesday, October 2, 2012

Crafty Kids Project #3: Birthday Card for Lola


Last Sunday, my grandmother celebrated her 86th birthday.  The week before that, we rounded up the kids (great grandkids, actually) to make a birthday card for her.  "Lola" is Tagalog for grandma, and interestingly enough, great grandchild translates to "apo sa tuhod".  Which literally means grandchild at the knee (yes, the body part), while great great grandchild is "apo sa talampakan" - grandchild at the sole (as in the bottom of the feet).  Odd, isn't it?  I wonder how those terms came about.  But I digress, so back to the kids making a card.

Actually, I recently purchased this flower-shaped mini album (made up of 5 foam pages and bound with a ball  chain) for this particular occasion, so the kids can each have a page for their greetings.  But instead of letting them loose and do whatever they want with their page, in the end my sister and I wanted to make a unified mini.  As I was browsing Scrapbuck.com (please check them out - they have a lot of great stuff at a very reasonable price) a couple of weeks ago, I saw some really cute animal wall art.  And this has inspired me to have on each page, a particular animal with a its own sentiment.  Here's what I came up with:
  • Bird:  "A little bird told me it's your BIRTHDAY!" (cover page)
  • Chicken:  "How egg-citing!"
  • Hippopotamus:  "Hip-hippo-ray!"
  • Bee:  "Bee happy!"
  • Cat:  "Have a purr-fect day!"
To prep for this project, I stamped the sentiments on white cardstock, sketched out and cut all the shapes  for each paper pieced animal, and finally, left out the colored markers and stickers so the kids can decorate the pages however they wish.  And so here they are with the pages they made.


This is a little more effort on the kids' part as when they got their kits, they had no idea how to arrange the pieces to make up their animal of choice.  Fortunately, I still had my original sketch of the different animals and what they were supposed to say, so we just passed that around until everyone was able to finish their page.  Then they wrote/drew their personal greetings on the back of their page.  And by the way, my sister stepped up to make the hippo page, since nobody wanted to do it.  The kids were probably intimated by the number of pieces (10) or got confused because it's pink.  In any case, we all had fun.  It's all in the googly eyes, I think. :-) 


Materials:  Mini album and stickers (All About Scrapbooking), magnetic alphabet stamps (Making Memories), ink (Studio G), border die cuts (Papemelroti), others - colored markers and googly eyes.

Saturday, September 22, 2012

Handmade Birthday Cards

After I finish a layout or some other type of crafty project, I have a bunch of scraps that I simply cannot throw out.  I keep them all to use in other projects, but the easiest way to finish up those scraps it to use them on cards.  Apart from the cardstock, this card is made from scraps.  So those tiny pieces of adhesive patterned paper still got some use, since making the pennants for the banner didn't require large chunks of paper.  The border on the bottom comes from a narrow strip of patterned paper left over from a layout I did a while ago.  I hand stitched the string for the banner and wrote the greeting right on top of it.  I made this card almost two months ago, but did not upload it 'til now.  And would've forgotten about altogether it if I hadn't made this next card for a dear friend of mine.


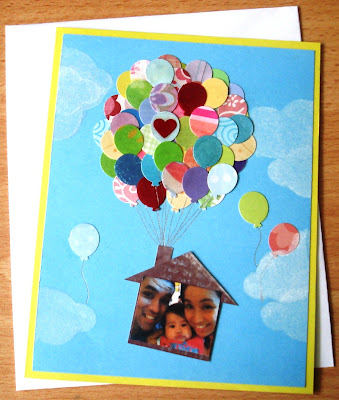
This card is actually more than a week late (my friend's birthday was last Sept. 14th).  Though I had planned on making it way before, everything just got crazy hectic at work and I just didn't have the time to make it until last night.  This is inspired by the movie "Up", which my friend really loves, and I've actually seen layouts online that are similar.  The balloons are punched out from assorted scraps of patterned paper/cardstock.  I've put glossy accents on some of them to give them more dimension and a balloon-y kinda feel.  I cut out cloud shapes from scratch paper that I used as masks.  I simply pressed the white inkpad into the cardstock base and blotted the extra ink with paper towel to even it out.  The sentiment inside reads: "Our wish for you is that everything will be on the UP & UP this year and in the years to come." 


Materials:  Cardstock (All About Scrapbooking), pen (Uni), ink pad (Fancy Ink Box), others - embroidery floss, assorted patterned paper & cardstock, tools - border punch (Fiskars), craft punch (CarlaCraft), and stamp (Crafty Secrets).

Monday, September 10, 2012

Page Remake: Birthday Buddies


We're well into September by now and one of the things that stand out about this month is that a big bunch of people that I know celebrate their birthdays in Sept.  In my family alone, there's my eldest nephew, my sister, my paternal grandmother, my maternal grandfather, and of course, Vicenta.  Among my friends they are probably too many to count right now.  But here is a layout about a small subset of those, who I spent a lot of time with during grad school.  And though we don't get to celebrate birthdays together anymore (I miss these guys so much), here's to wishing they're always happy and memorable!

Supplies:  Cardstock (All About Scrapbooking), stickers (EK Success & Making Memories), rub-ons (All About Scrapbooking).  Others - ribbon (recycled from a gift), journaling block (shimmery paper scrap), letter rub-ons.

Sunday, July 15, 2012

Page Remake: MAC


Another remake of a page from my US scrapbook.  I actually split one page - of some pictures taken in the summer of 2000 - into two layouts.  This is the first of the two, which is all about the son of another grad student (who is also a close friend), and about how they came to name him Mac.  The pictures were taken at his older sister's birthday in May and at his first birthday in July.  I love making the little banners and how they give the layout a summery feel - to remind us of all the picnics and barbecues we had back then.  I also wrote the journaling by hand and incorporated it into the layout as the string from which the banners were hanging, leaving the page looking clean and simple.

Journaling:  "Mac is such a sweet little boy, the second child and only son of Cesar and Arlene.  Cesar has this neat little story of how they came up with the name: in Gaelic, it literally means "son of"... and since he is the one and only son, it's so him."

Supplies:  Cardstock (All About Scrapbooking and Star Paper Corporation), patterned paper (DCWV), paper flowers (Prima), fabric tape (Shallow Grass), felt letter stickers, flower trim, & acrylic flowers (All About Scrapbooking), black pigment ink pen (Uni), others - lace.

Sunday, June 17, 2012

Page Remake: Celebrate!

Another remake of a page from my US scrapbook.  The original unfinished page had these five pictures cut in small circle shapes and arranged in a larger circle.  I had a celebration theme in mind since we were at a party celebrating Cesar successfully defending his Ph.D. dissertation, Arlene's birthday (Oct. 27) and my own birthday (Nov. 17).  I kept the original theme and put each picture on individual tags which are actually recycled.  They're real tags from purchased items... mostly clothes, and I still do have a lot of tags to recycle.  I covered them with patterned paper scraps and embellished them ribbons, twine, eyelets, and tags.  Hand cut letters for the title and used an assortment of stamps to fill in the space between the tags and the title.  Inked all the edges with the same white ink I stamped with.

PS.  After I took this picture of what I thought was the finished page at the time, I decided to write journaling around each picture in black ink (Stabilo).

Supplies:  Kraft (So Fun), ink (Craft Smart & Fancy Ink Box), eyelets and charms (All About Scrapbooking), rubber stamps (All Night Media, Hampton Art, Scrappy Cat), clear stamps (All About Scrapbooking, American Crafts, Creative Imaginations, Hampton Art, Imaginisce, Inkadinkado, Making Memories, Megilo, Pink Paislee, Studio G).  Others - recycled tags, patterned paper scraps, ribbons, twine.

Saturday, June 16, 2012

Happy Birthday Mini Album for Jillian

 A little over a month ago, my niece, Jillian, celebrated her 6th birthday.  I made her this mini-album as a gift.  It took a while to do, and I was only able to give it to her a week later.  I had planned on making an envelope mini-album and it was nearly done when I showed it to my sister (Jillian's mom) and she suggested that it might get damaged from the kids handling it.  That actually made sense, because I'm the eldest of five, and all four younger siblings are married with a total of 8 kids among them (I have 3 nephews and 5 nieces).  So there are a lot of little and grownup hands that will leaf through the pages.  So I took the pages and tags apart and reconstructed everything to fit into 6"x6" page protectors and bound them all in a sturdy (I hope!) album.  So on that particular Sunday lunch with the whole family, including my parents and grandmother (we are one big family), the album was passed around and we did a bit of reminiscing and a lot of laughing.  It took a lot of work, but it was certainly worth it.


Friday, April 20, 2012

Now I know my ABC's

I worked on this project early in February as a birthday gift to the sweet little girl of a friend from work.  Due to the busy work sched, I was unable to make it in time for her birthday, but I heard that she liked it.  She especially liked touching it, which was so gratifying for me because I specifically picked all the different elements for their textures.  The bright pink post-its are placeholders for the family members' photos: "N" for Nanay (mom), "T" for both Tatay (dad) and Tala (the birthday girl's name, and such a pretty one at that).  I really had fun with this one and was glad that it can be easily finished in one weekend: one day to choose what goes into it (as I have a lot of stuff that needs sorting through and putting away) and another to put everything together.  Here's the finished project:


This was actually inspired by this project on scrapbooksetc.com:


...which I thought would be a great handmade gift for a baby/toddler.  The only difference probably is that mine was made to be touched, instead of being just on display.  I hope the glue holds up :).  Good thing that I used DCWV Adhesive Paper Prints for all the patterned paper, just needed to be cut into squares and then it sticks readily to the canvas base.  Alphabet stickers and many of the other shapes from All About Scrapbooking, the rest are from Craft World, Darice, K&Company, Making Memories, Michael's, Papermelroti, and Yellow Violet House.

Saturday, September 18, 2010

Sunshine-y Birthday Card

The front and back of the card


A good friend was about to celebrate her birthday a couple of weeks ago. I wasn't really sure if she was turning 50, so I made this card for her, with lots of space for everybody to write their birthday greetings and messages on. But when I confirmed that she was indeed celebrating her golden birthday, we had to do something special for her. So this card is just waiting in my desk drawer at work for now. Btw, this card is (again) mostly made from scraps. :)

What's inside