Showing posts with label handmade. Show all posts

Wednesday, December 19, 2012

Twelve Crafty Days of Christmas - Day 2: Personalized Notepad


My sister asked me a while ago if I can help her out with gifts for her friends at work.  That was actually quite some time ago and I've finally gotten around to working on them.  The idea was to embellish and personalize plain notepads. 


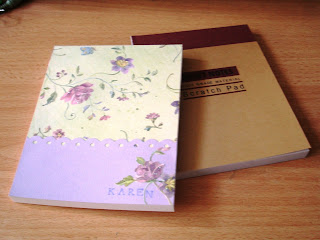
So here's the first one I made... it's very simple with just floral patterned paper and plain lavender paper fancy-fied with a border punch.  I also hand cut some of the flowers on the patterned paper to decorate the area around the name that I stamped using some teeny tiny alphabet rubber stamps.


It looked a little too simple, so I made the flowers sparkly with some glitter glue.  This was fairly easy and quick to do.  I actually need to make twelve more of these for my sister.  Speaking of the number twelve... I missed posting for two consecutive days in this series already.  You all know how busy the Christmas season gets.  But I am still determined to put up 12 posts in all, no matter how long it takes (maybe it will take me into the new year). :-)

Materials:  Notepad (Paperline Kraft Notes), patterned paper (K & Company), plain paper (Sterling), glitter glue (Leeho).  Tools:  Fiskars Threading Water border punch, Studio G alphabet stamp set.
Saturday, September 22, 2012

Handmade Birthday Cards

After I finish a layout or some other type of crafty project, I have a bunch of scraps that I simply cannot throw out.  I keep them all to use in other projects, but the easiest way to finish up those scraps it to use them on cards.  Apart from the cardstock, this card is made from scraps.  So those tiny pieces of adhesive patterned paper still got some use, since making the pennants for the banner didn't require large chunks of paper.  The border on the bottom comes from a narrow strip of patterned paper left over from a layout I did a while ago.  I hand stitched the string for the banner and wrote the greeting right on top of it.  I made this card almost two months ago, but did not upload it 'til now.  And would've forgotten about altogether it if I hadn't made this next card for a dear friend of mine.


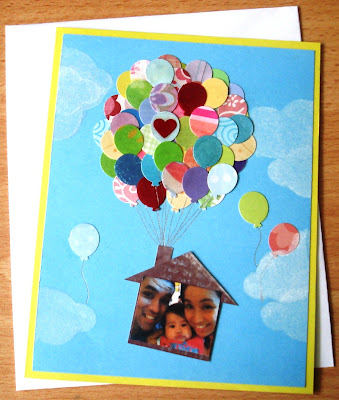
This card is actually more than a week late (my friend's birthday was last Sept. 14th).  Though I had planned on making it way before, everything just got crazy hectic at work and I just didn't have the time to make it until last night.  This is inspired by the movie "Up", which my friend really loves, and I've actually seen layouts online that are similar.  The balloons are punched out from assorted scraps of patterned paper/cardstock.  I've put glossy accents on some of them to give them more dimension and a balloon-y kinda feel.  I cut out cloud shapes from scratch paper that I used as masks.  I simply pressed the white inkpad into the cardstock base and blotted the extra ink with paper towel to even it out.  The sentiment inside reads: "Our wish for you is that everything will be on the UP & UP this year and in the years to come." 


Materials:  Cardstock (All About Scrapbooking), pen (Uni), ink pad (Fancy Ink Box), others - embroidery floss, assorted patterned paper & cardstock, tools - border punch (Fiskars), craft punch (CarlaCraft), and stamp (Crafty Secrets).

Wednesday, May 16, 2012

Easy to Make Cards


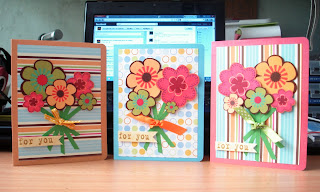
So after cleaning my desk, the very first thing I made was handmade cards.  I have long been wanting to work on these after being inspired by cards that I've seen in magazines and on youtube.  And I have to make a special mention: Kristina Werner's cards are awesome (http://www.kwernerdesign.com/blog/).  Her cards are really pretty and simple, and the way she makes them in her videos is simply inspiring.  Though these cards I made were actually inspired by an insert in a Scrapbooks etc magazine that I got last year.  It's a special on cards: 12 cards for any occasion, and I just wanted to do something quick and easy.  Although these were in no way quick since I had to cut out the flower and star shapes.  Sadly, I have to work some more on my scissor skills, but I'm pretty pleased with the results.


Tools & Supplies:  cardstock, patterned paper , ribbon, brads, and letter stickers (All About Scrapbooking), ink (Craft Smart and Fiskars), alphabet stamps (Making Memories), corner rounder (EK Success)

Sunday, May 13, 2012

The Flowers of May

One of the things that I remember doing as a little kid during summer is offering flowers to the Blessed Virgin Mary in church during the Flores de Mayo season.  And it's really unbelievable how summer just flew by and now we have just a few weeks before school starts.  I had planned on sorting out all my stuff and cleaning out my room this summer which, up until now, is a work in progress (more on that later).  And try as I might, I wanted to discipline myself by not doing anything crafty until all the cleaning is done, but I just couldn't help myself!  So I give in every once in a while and work on small things... and one major project (for my niece's birthday).  Lately, I've been enamored by pretty flower embellishments and so I tried my hand at making lace ones and used a bit of bling for the flower centers.  I think they turned out pretty cute.